How To Create Order Bumps and Upsells on Launch Cart
Order Bumps and Upsells are powerful tools that help increase the average order value (AOV) of an eCommerce store.
As the cost of ads goes up, you need to maximize the revenue you get from each customer. You’ve got them to your store, now it is time to squeeze every penny you can out of them 💰💰
In this blog post, we’re going to show you how to create order bumps and upsells on Launch Cart our favored eCommerce platform. (Check out how you can get started with Launch Cart for free with Printify or Printful)
We’ll cover the end-to-end process to set them up in your store to create effective sales offers that will encourage customers to upgrade their orders. Let’s get started!
What is an Order Bump
An order bump is a special offer that is presented to a customer at the checkout page. Order bumps are typically small items or add-ons that can be added to an order with just a few clicks.
For example, let’s say you’re selling phone cases. An order bump might be an offer to add a screen protector to the order for just $5.
The key with order bumps is that they must be incredibly relevant to the product that the customer is already buying. If they’re not, then chances are the customer will just ignore the offer.
Additionally, order bumps should be priced low enough that they seem like a no-brainer purchase. After all, if the customer is already buying a phone case from you, then they’re likely to be open to purchasing a related product like a screen protector.
What Are Upsells?
Upsells, on the other hand, are offers for products that are more expensive than the product that the customer is currently buying. Unlike order bumps, upsells are not presented on the checkout page.
Instead, they’re typically shown after the customer has already made their purchase. For example, let’s say someone buys a basic phone case from you for $20. After their purchase is complete, you could upsell them on a more premium case for $40.
The key with upsells is that they must be higher quality (and priced accordingly) than the product that the customer originally purchased. If not, then you risk annoying or even angering your customers by trying to sell them something that’s not worth the price tag.
Additionally, it’s important to make sure that your upsells complement the original product—if they don’t, then it’s likely that the customer will just ignore your offer altogether.
The Benefits of Order Bumps and Upsells
There are two main benefits of using order bumps and upsells: they can increase the average order value (AOV) and they can boost customer satisfaction. Let’s take a closer look at each of these benefits:
Increased AOV
One of the main reasons why entrepreneurs and influencers use order bumps and upsell is because they can increase the average order value (AOV).
By offering additional products or services at checkout or after a purchase has been made, you’re giving customers the opportunity to spend more money with your business. And as any business owner knows, increasing AOV is key to growing revenue.
Boosted Customer Satisfaction
Another benefit of using order bumps and upsells is that they can help boost customer satisfaction.
This is because when done correctly, order bumps and upsells give customers the chance to get exactly what they want from your business. For example, let’s say you own an online store that sells T-shirts.
A customer comes to your website and finds a T-shirt that they like but it’s not available in their size.
However, you offer an order bump for a custom-made T-shirt that will be made specifically for them. This not only increases your AOV but also boosts customer satisfaction because the customer was able to get exactly what they wanted from your business.
Order Bumps Vs Upsells – Which To Use
Both order bumps and upsells can be effective ways to increase your average order value. However, it’s important to understand the difference between the two before deciding which one is right for your business.
Order bumps should be highly relevant to the product being purchased and priced low enough to seem like a no-brainer purchase.
Upsells, on the other hand, should be of higher quality (and priced accordingly) than the original product and should complement it in some way.
By understanding these differences, you can choose the method (or methods) that are right for your business and start increasing your average order value today!
Launch Cart Upsells Down Sells and Order Bumps
Before we get into creating an upsell and order bump on Launch Cart you need to understand how they are structured on the platform.
Upsells, Downsells, and order bumps are contained in what Launch Cart calls an Upsell Flow.
Within a flow, you can create an order bump and multiple upsells and downsells.
Launch Cart includes 1 Upsell Flow in their free plan, 3 in the Lift Off Plan, 10 in the Growth plan, and unlimited flows in their scale plan.
How To Create An Order Bump on Launch Cart
Log in to your Launch Cart store. If you don’t have one yet, check out our articles on how start a print on demand store for free with Printful or start a store for free with Printify.
Go to Super Powers (Apps) on the left-hand side menu
Click on Manage on the Automatic Upsells to enable it.

On the next screen click New Upsell Flow – if you already have upsells and order bumps set up they would show up here.

Enter a Title for your Order Bump. I strongly recommend something that will help understand what the order bump is as you may end up with a number of them.
Select the Trigger Type that you want to use. You can select either a specific product or category to trigger the flow or add it to all products.
If you choose a single product for example the order bump will only show for that product.
You may want to show different products in the order bump depending on the trigger. For example, if the product category is a hoodie, you may want to have a mug or t-shirt for the order bump.
If the item is a T-shirt, you don’t want to be offering the same shirt as the order bump.
We are going to use Category as the trigger in this example
Click Save
The Order Bump isn’t live yet. We need to configure it first.
Click Select A Bump Offer

Now select the product that you want to show on your check-out page as an order bump and click save
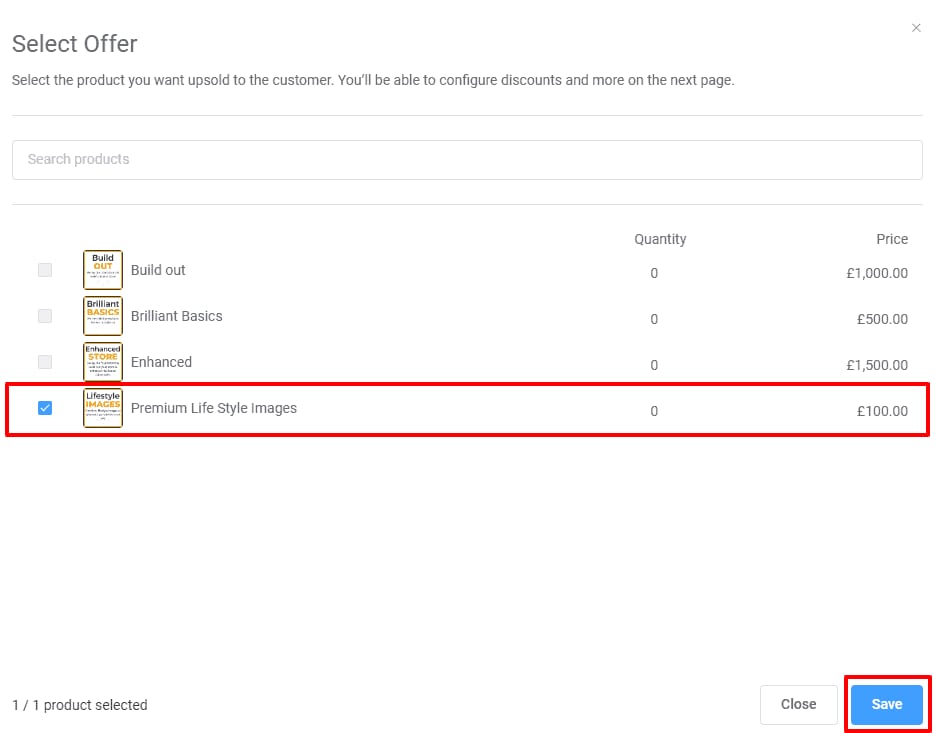
Click the Cog (shown in the red box in the image below) and then click Edit from the menu that pops up.

We will now step through the options you need to configure for a high-converting order bump.
Bump offer Product
It is recommended to apply a discount to your product in order to entice people to add it to their cart, so switch the Apply A Discount toggle to on.
Now you can choose to apply a fixed discount e.g. $10 or a % discount.
For this example, I will set the discount to 20%.
Shipping
Here you set the shipping that should apply to the item. Either free shipping or Use Default Shipping Rate.
In this example, we will use the Default Shipping Rate as this is a digital product.
Override Product Quantity
You can set the Quantity to allow/restrict the customer to choose how many they want, or you can override it by setting the quantity they are allowed to buy i.e. one per customer. Toggle the switch on or offer depending on your needs.
I will leave the Override Product Quantity off.
Hide offer if the cart already contains the upsell product
This is an important setting and in most cases, you want to turn this on.
Turning the setting on ensures that a customer doesn’t see the offer if they already have the product in their cart.
There is no benefit to offering a discount on a product the customer has already chosen to buy.
TITLE & DESCRIPTION
Now we need to write the Title and Description of the product.
Filling in the boxes will populate the information shown in the blue box on the image below.

Launch Cart by default populates this with the product Title and Description, but you want to replace these with more engaging text.
Once populated you need to set the Call To Action that shows as the button to add to the cart. I’ve gone with I WANT THIS GREAT DEAL
The second CTA box is for customers who have added the item but then change their minds.
Here I’ve gone with “Changed My Mind – I do not want this great offer“
LOOK AND FEEL
On the right-hand side of the page, you will see a Live Preview of what the order bump will look like.
In the Look and feel section, you have several settings to make the order bump stand out and fit your store.

Here are my preferred settings.
Modern Vs Dashed
I go for dashed as it helps it stand out a bit more. Testing carried out by the Launch Cart team indicates that the dashed red line converts better.
Show Image
I always show an image. By default, Launch Cart shows the default product image.
Depending on the product I am using for the order bump I may upload an alternative image created specifically for the order bump.
If you want to use something other than the default product image, simply click the drop-down and select Custom Image Upload and upload your chosen image.
Customize Title
I like to change the color of the title and the title background to red and white respectively.
To do this, toggle on the Customize Title option and choose your desired colors.
Show Flashing Arrow
I prefer not to use the flashing arrow. When turned on, a flashing red arrow points to the add-to-cart button.
If you want to use it, simply toggle the button on or off depending on your preference
Remaining Options
For each of the options below, you can toggle on or off as required. I leave all these items on. The only option I may change is the Show Quantity Selector if I want to limit the quantity of the product that the customer can add to their cart.
– Show Original Price
– Show Discounted Price
– Show Discount Flag
– Show Quantity Selector
Now you have set up your order bump, scroll to the top of the page and hit save and then Go Back.
Publish
On the page shown you will see the order bump, you have just created.
In order to publish this to your store, click the Publish Flow button shown by the arrow in the image below.

Check out this video of Launch Cart CEO Greg Writer showing off the order bump and upsell capabilities
How to Create an Upsell on Launch Cart
To build an Upsell go to Super Powers (Apps) on the left-hand side menu
Click on Manage on the Automatic Upsells to Manage or Enable it if you haven’t created an order bump or upsell before.
If you have followed the above steps to create an order bump you can click on the Pencil image to edit the Upsell Flow that you’ve already created.
If you are starting from scratch, then click New Upsell Flow.
Enter a Flow Name and select a Trigger Type from the drop-down menu. For this example, I have selected all products which means the flow will be triggered for all products. If you select one category or select a Product, the flow will only be triggered by the selected product
Now scroll down the page a little and click Add Upsell Offer as shown in the image below.

You will now be shown a list of products from which you need to select the product you want to offer as an upsell.
Select the product by checking the check box next to the product and click save.

We now need to configure the upsell. Click on the Cog and click the Pencil to edit the Upsell.
This takes you to the Launch Cart page builder where you can edit / build the page that shows the product being offered as an upsell.
The Page Builder is extremely powerful and you can build a page by dragging and dropping items from the right onto the main page on the left.
By default Launch Cart show the default product page in the main body with an additional header and count-down timer.
Creating An Upsell Offer Page
The design and the information you put on the page will depend on the product you are upselling.
If you are selling a course for example you would put far more information than you would for a hoodie.
Page Builder Tips
The Page Builder functionality in Launch Cart is very powerful and you can spend days and days (I have) creating long-form sales pages.
Here are a few basic tips to get you going with the page builder:
Clicking on any part of the page will select it. This is shown by a blue outline around the block. The options shown on the right-hand side will change to show those options for the selected block.
If you click off of a block (and have no blocks selected) the menu on the right will show all the content blocks that can be dragged and dropped onto your page.
To delete a block. Click on it, and once it is selected (blue box surrounding it) you will see a trash can symbol. Click that and it deletes the block.
You can click the blue button to Save your page and if you click the three dots you can change the product that is being used in the upsell.
It’s worth playing around with the page builder as it is a key piece of Launch Cart functionality that is also used to create stand-alone pages like the About Us page or a long-form sales page .
Key Items I change when upselling a simple product

Header
Click on the Header and update the text to something enticing “Special Offer for New Customers” or something similar.
When you have the header box selected you can change formatting using the settings on the right-hand side. I usually change the colors and font to make it stand out.
Title and Product Details
Click the main body of the upsell page and go to Title Settings – Custom Title and give the product a more enticing title that is specific to the offer you are making.
Then go to Description Settings – Custom Description and replace the standard product description with something short and simple to highlight the benefits of the product. You don’t want loads of information for a simple product.
Introduce Urgency
The Pagebuilder includes a countdown timer and a high-demand block. Both are great for introducing a level of urgency which has been shown through many tests to increase conversion.
Buttons
Change the colors and text of your buttons. For the add to cart, you should change the text to something positive like Yes I’d Like This Great Offer and for the decline button, you should make people think twice about clicking it. I use something like No I Do Not Want This Great Deal or No I Do Not Want To Save Money Today
Save Add More and Publish
Once you are happy with your page. Click Save at the top right and then click the grey arrow button to go back.
You will be shown your Upsell Flow page and if you’ve followed the steps correctly you will see your upsells and order bumps.
If you like you can now add a downsell to the flow. A downsell is an offer that is displayed when someone rejects an upsell.
You can add further upsells and downsells but it is worth considering the customer experience. Don’t add too many or you will annoy your customer.
Once you have finished adding new upsells, downsells, and order bumps, make sure you click publish. Now your upsells are live.
Conclusion
Conclusion paragraph: Upsells and order bumps are great tools for increasing average order value. If you want to be able to spend more on advertising and see a corresponding increase in sales, then you need to start implementing upsells and order bumps into your store.
These techniques are easy to add and can have a big impact on your business. Have you tried adding upsells or order bumps?